Search This Blog

Thursday 26 December 2013

Diagonal polka dot nail art

This was from a while ago, but I had to do something smart on my nails for a formal event and didn't want any bright colours on my nails so I made up this design.

I separated my nails diagonally and painted them with two contrasting colours - a black and a light grey. The black I used was by Barry M and the grey was called 'Angel Wings' by Collection.
I then used a dotting tool to print dots along the diagonal lines with the alternate colour on each sides - so on the black side I used grey dots and for the grey side I used black dots.
This is what the finished look looked like...


I also found that from a distance, the dotting effect made it seem like the grey blended into the black and looked almost like a gradation. It looks really effective and didn't take long to do. 
You don't have to stick to these colours, you can use whatever you like to make it look more fun but I think contrasting colours work best.
Try it yourself ♥

Monday 23 December 2013

Bandage dress inspired nail art

So, I came across this really pretty shade called 'Milkshake' by Collection. It's a lovely, light pink dusty colour and I thought it'd make a nice base to do a contrasting nail design with.
I thought up of this design and it's where you basically have to draw lots of straight lines in different directions so that they look they are over and under lapping each other. This is similar to what the material is like in bandage dresses as they have to be wrapped around the body. I actually found this picture after I did my nails like this but the top part of the dress is nearly exactly the effect I had recreated on my nails....

I used a fine nail art pen (LA Colours) so that I could create these steady lines. 
This is what the finished design looked like:


These really stand out and I got a lot of compliments. I was also told they look quite tribal which I think is good as that's a big trend at the moment. 
They did take me a while to do, especially on my left hand but I definitely think it paid off. 

I hope you have a go and let me know what you think ♥


Sunday 22 December 2013

Tiger print nail wraps

I rarely use wraps, but I had these lying around so I thought I'd use them. They're these glitter textured tiger print nail wraps which are really easy to apply. 

First, you select a suitable size and stick it on your nail. Then, you get a hairdryer and blow heat over the nail to melt the glue onto your nail. Let it cool and file off the excess. You can also apply a bit of top coat on the tip of your nail to secure them and so they don't chip. I wouldn't advise putting a top coat over the whole nail as that will ruin the textured effect. 

This is what they look like:
 

These lasted me a little longer than a whole week which i think is pretty good. There's loads of different designs you can try and they're great if you don't have time to do your nails yourself.
Thanks for reading ♥

Sunday 6 October 2013

Galaxy Nails!

I have really wanted to try out the ombre technique on my nails for ages which is basically when you blend two or more colours to get a gradation effect. So, I thought I'd do this to achieve a galaxy/cosmic style look.

The nail varnishes I used ranged from a really dark green to a royal blue to a deep purple. I blended them together in a vertical manner but I guess you could even do this in a swirly style to make it seem more like galaxy.


The products I used were:
-Collection Hot Looks in '24 Shameless'
-Sally Hansen HD in '18 DVD'
-Collection Lasting Colour in '6 Purple Rain'


Although I used shimmery nail varnishes, I added on a thin coat of gold glitter just to make it extra sparkly. The nails will be quite rough from the blending so you have to put on a good layer of clear top coat. It can also get quite messy so I found it helpful to clean up the edges of my nails with a cotton bud stick dipped in nail polish remover.
This is what it looked like at the end....


Noshin ♥

Saturday 5 October 2013

More henna....

I thought I might as well upload some of the other henna designs I have done in the past for fun, so here they are...


Twirling floral arm design

I did all of these myself and these are all my own photographs that I took.

Noshin ♥

Henna Hands

This isn't directly nail art related, but I just thought I'd share some of the henna/mehndi designs I did for last Eid. This was a month ago, but there is another Eid coming up in a few weeks so this feels like the right time to upload these so you can take a look at some of the styles and get practicing if you want to have a go! Remember that henna isn't just for Eid, but it is commonly used in other festivals and celebrations like wedding, Diwali or just for fun :)

So, the first one is quite a complex design. because it has very intricate details and needs to be drawn exact to get it to look right. It is very bold, traditional Arabian design and these mandala styles look best featured in the palm of your hands. I did this on my own hand so I could only do it on my left hand.

This is what it looked like immediately after I washed it off. I looks bright red but this was down to the artificial lighting. It was in fact a deep brown colour and it darkened as the days went by.
The next design is one I did on the back of my left hand. It is a really elegant design with paisleys running up the middle finger from the wrist and it's slightly simpler to do too. 


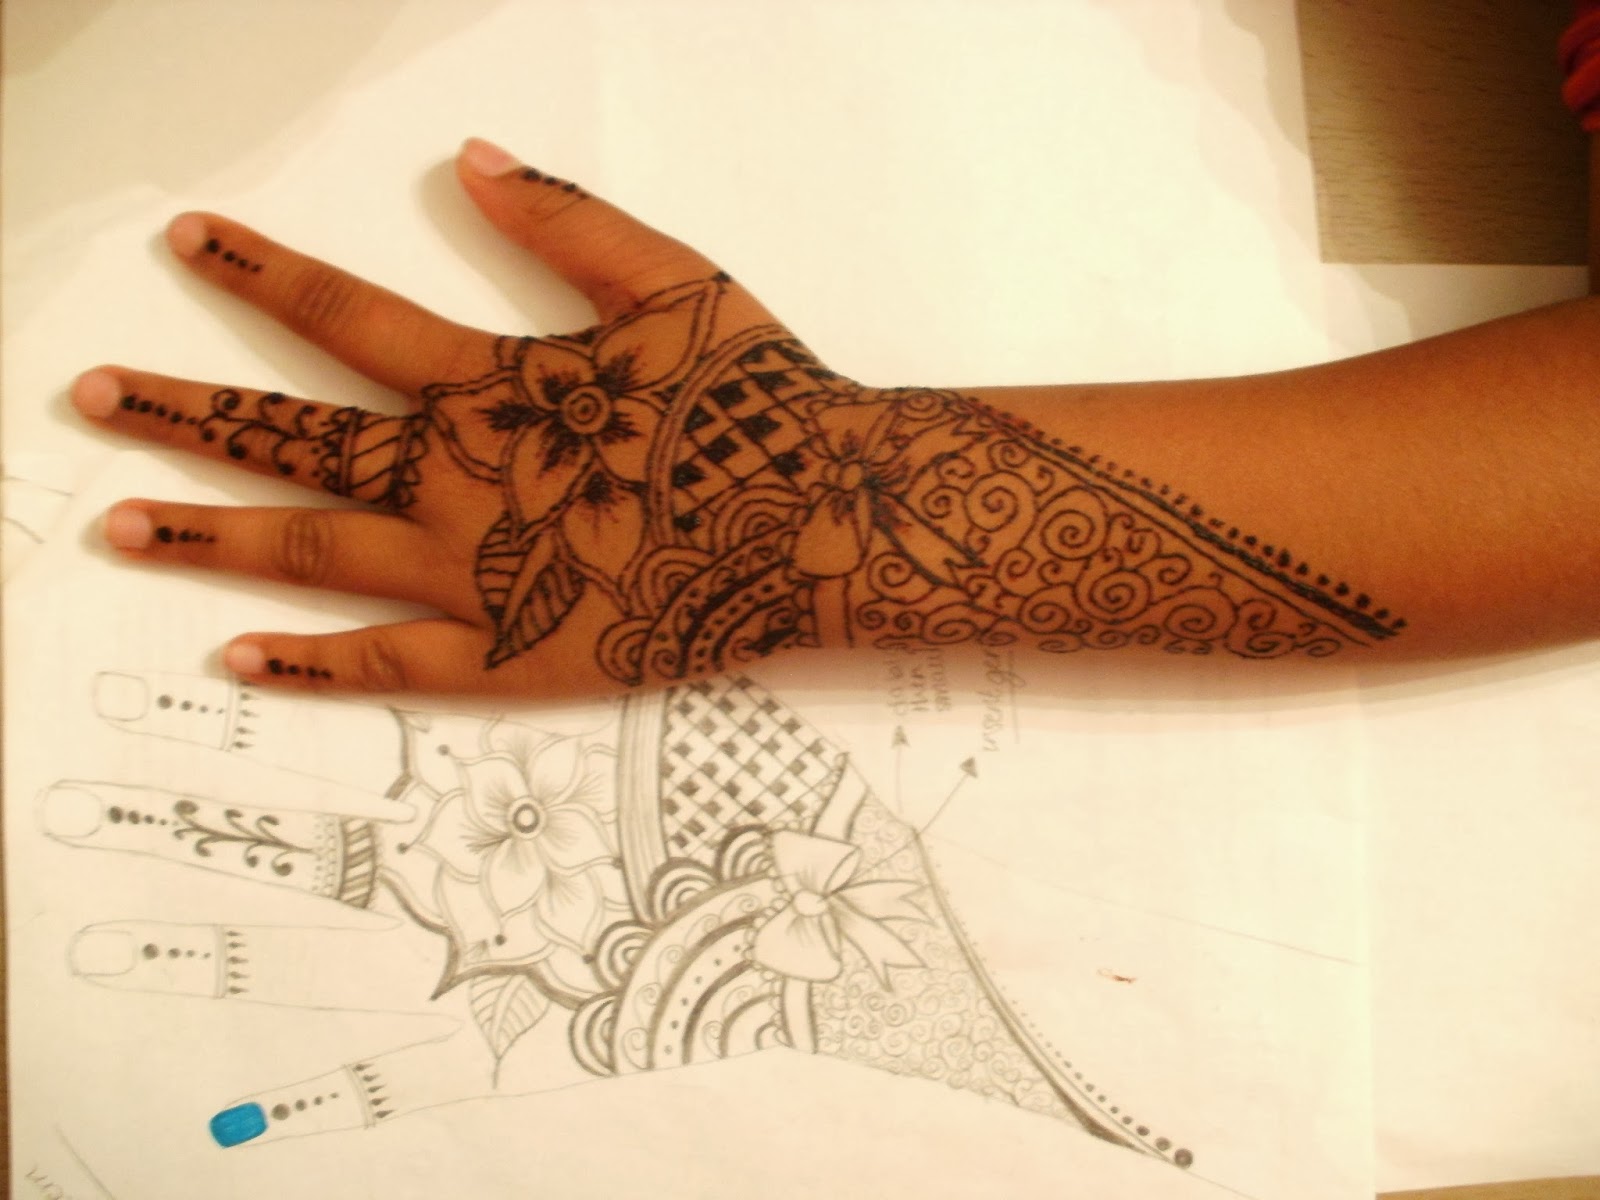
\The last design I'm going to share is one that I did on my little sister and this was a design that I actually made up myself by sketching it out on paper first. I included things she likes in henna like lots of swirls and flowers and I even drew on a bow on the wrist.


I have seen lots of nail art designs inspired by henna and henna itself can even be used on nails. It is a really fun thing to do so i really recommend giving it a go!

Noshin ♥

Sunday 22 September 2013

Cutex Moisture Guard Nail Polish Remover

So this isn't a nail design, but I thought I'd mention this nail polish remover that I've been using recently. Its the Cutex Moisture Guard and it is really good for brittle, dry nails. My nails tend to snap quite easily but after using this, I'd found a slight difference in how healthier and moisturised they were.
This also has a nail whitening formula as well which I couldn't really notice on my nails as they are quite white anyway but I'd really recommend this anyway.
The pricing isn't too bad either - I bought the small 100ml bottle for £1.82 from my local pharmacy but I'm pretty sure you can get the 200ml for cheaper.


There are also different ones worth a try in their range for different nail types like specifically 'Strengthening' for weak nails, 'Ultra Cleansing' for natural nails and more.

Noshin ♥